Notice!
I’ve found that this book project has been showing
up on more and more search engines lately and is also being directly linked to
for the information it contains(1). I therefore find it necessary to warn all
persons viewing this document that it is a work in progress, and as such it
contains errors of all kinds, be them in experimental procedures that may cause
harm, or in faulty reasoning that would get you slapped by nearly any chemistry
instructor. Please for now take
the information here with a grain of salt.
|
Most Importantly! By reading further you
agree not to hold the authors of this document responsible for any
injuries/fatalities that may occur from attempting to make any of the
products or following any of the procedures that are outlined within. Chemistry inherently possesses a degree of
danger and you must understand this, wear gloves and more if the situation
calls for it, your safety is in your own hands, not mine! |
Also note that this project is open for contribution
by any party on the internet. Simply
submit a section to Rob.Vincent@gmail.com
and it will be added into the text pending editing and such within a few
weeks. Any person contributing will
have their name mentioned in the credits.
Thank you for reading this, and enjoy!
|
1 |
Although
this document may be directly linked to, it will not work in that manner as I
have hotlink protection for PDF documents, however directly linking to the
html document is possible, still though I would prefer links be to the main
book project page. |
8.1 Working at high temperatures
8.1a Advanced Heating techniques
1) Charcoal/Coal:
Charcoal and coal are the simplest and initially least expensive fuels to use for a furnace. All one needs is a blower to force air into the furnace, and charcoal to put in the furnace. Although a hair dryer will work, it will not work as well as more powerful blowers, such as the blower from a dryer. Charcoal is easier to obtain than coal, and can easily be made from wood, but because it is much lighter, small glowing fragments shoot continually into the air from the furnace, reaching heights of several meters. Both charcoal and coal provide enough heat for practically any furnace use, from melting metals to forging iron. The main problem with both is the mess; charcoal will land in crucibles full of molten metal, and can be skimmed out, but is still a hassle.
2) Wood:
Wood can be used instead of charcoal and coal if they are unavailable, and works very well as a fuel if split into small chunks. Wood has been used for centuries to fire pottery to a glowing yellow-white heat, and if used correctly can easily get that hot. The problem is that it burns so rapidly that more must continually be added, which is awkward, and it tends to land on top of crucibles and other apparati in the furnace, and burns above them, meaning that they don’t receive much of the heat. This can be solved by making a furnace or kiln with a chamber below or to the side of the main chamber into which the wood is added and through which the air blows on its way to the main chamber so that all of the heat reaches the furnace charge.
3) Oil:
Oil may be the cheapest fuel in the long run because it can be obtained from restaurants for free, but it takes special equipment to burn. Oil will not easily ignite as a liquid because of its very small surface area. This can be solved in two ways; either the oil is atomized into small drops or it is vaporized by heat. The oil can be atomized by stretching it into a thin film, which is then broken up. This is accomplished by injecting the oil through a special nozzle into the furnace under pressure, which is the approach that most commercial oil burners use, by stretching the oil as a thin film over a sphere with a miniscule hole out of which high pressure air is blown (babbington burner), or by rotating the oil in a cup; as it is flung off of the walls of the cup, an air blast breaks it up into a spray. (rotary cup atomizer) The problem with this approach is the special equipment required. The other approach is much simpler. A smaller chamber or the furnace itself is preheated using wood or other fuels, and oil is then dripped or injected into the chamber along with air from a blower. The oil hits the walls of the chamber, vaporizes, and combusts; the process is self-sustaining. The problem with vaporizing oil is that there are almost always cracks through which the partially burnt vapor leaks, causing a very unpleasant and probably unhealthy stench. Also, this method takes several minutes of preheating, and is difficult to get running smoothly. There is a commercial product called the Isomax Blue Flame Burner ® which is a tube with a side passage used to recirculate preheated air. Propane is used to preheat the system, and then oil is injected into the side tube; it vaporizes, creating a blue flame as it returns to the main tube, and then is shot into the furnace. Part of the flame is recirculated into the secondary tube, and used to vaporize more oil.
1) Binders and aggregates:
Refractory compositions have two essential parts; binders, which are the glue used to hold the composition together, and aggregates, which are the main bulk of the composition. One could make a composition composed solely of a binder, of course, but as binders are usually more expensive than aggregates, and aggregates add desirable properties such as thermal insulation they are almost always used. Certain aggregates work best with certain other aggregates and binders; large amounts of both acidic and basic components should not both be used in the same refractory composition, as the composition may melt. A small percentage of components, which are fluxed and melt are sometimes actually beneficial because they form a glass gluing the rest of the particles together (perlite for example).
2) Commercial refractory compositions:
Commercial refractories mainly use binders based on three categories of anions; aluminates, phosphates, and silicates. Calcium aluminate, or ciment fondue, is created by the heating of calcia and alumina by charcoal in a blast furnace; the two components melt, are poured into ingots, crushed, mixed dry with the aggregate, and later cured by the addition of water. Calcium or aluminum phosphate binders are created by adding reactive alumina, or calcia to the refractory aggregate, and then adding orthophosphoric acid solution, forming a metal phosphate and water. Some compositions using alumina and phosphoric acid remain puttylike and unhardened until being fired. Furnace cements sometimes use alkaline silicates (eg sodium silicate) as a binder. Other refractory compositions, such as are used in arc furnaces for steelmaking, use phenolic resins which decompose to glassy carbon as a binder. There are many different commercial refractory aggregates; most are neutral compounds because of their greater compatibility, such as alumina, silicon carbide, etc. Where the binding agent is not ceramic (such as phenolic resins) the acidity or basicity of the aggregate is not important, and thus basic oxides with very high melting points such as CaO or MgO can be used.
3) Homemade refractory composition:
Obviously one simply duplicate a commercial refractory composition, but it is usually more feasible to use inexpensive compounds, such as clay. Various recipes have been made which use Portland cement, which contains a high percentage of calcium silicates. The calcium oxide in Portland cement is obviously a flux at high temperatures, and thus lowers the melting point of the composition, but cement does allow the composition to cure at room temperature, whereas pure clay only reaches its full strength after being fired to its maturing point. The outer parts of a clay based refractory furnace will never reach full strength, but this is usually not a problem. Essentially the recipe consists of approximately 15-30% clay; ball clay, kaolin, or fireclay work, but not bentonite, which looses its strength at high temperatures. The rest of the composition is composed of aggregates such as sand, whose main advantage is its low cost, and perlite, which decreases the strength of the composition because of its porous nature, but greatly increases the insulation value. Paper, wood chips, sawdust, or other combustibles can also be added to increase the insulation value as they burn out. Obviously the composition used will be based on what is available; if one can obtain alumina or other higher quality refractory materials, they should of course be utilized.
Crucibles:
1) Commercial crucibles:
Commercial crucible come in many different formulations and sizes. The most common are small porcelain, fused silica, fused magnesia, or graphite crucibles which used for chemical analysis, and mostly larger clay/graphite or silicon carbide crucibles which are used for metalcasting. Porcelain is a mix of kaolin, flint (a natural form of silicon dioxide), and feldspar, and when fired creates a mix which matures around 1300-1450 deg. C, forming a clay body with a large amount of glass. Fused silica and fused magnesia crucibles are fused from almost pure silica or magnesia powders at very high temperatures. Graphite crucibles are almost pure graphite, and are assumably created from graphite and carbon forming resins such as pitch or phenolic resins. Clay graphite crucibles are formed of a complex mixture of chemicals, obviously including clay and graphite, but also silicon carbide and more silica than clay alone has. It is not known by the author whether or not the silicon carbide is created in situ from silica and carbon when the crucible is fired, or is merely added as a powder. There are many varieties of silicon carbide crucibles, but many are created by bonding silicon carbide particles with phenolic resins. Crucibles are formed into their shape by processes including presses or slip casting.
2) Homemade crucibles:
Since the average mad scientist does not have access to the materials needed to create fused silica or fused magnesia crucibles, they are limited to creating clay bonded crucibles or resin bonded crucibles. Although crucibles can be made using a potter’s wheel, slip-casting is a much easier, more reproducible, and much more accurate process. In order to slip-cast a crucible, a slip is made. This consists usually of clay, to which is added 0.25-0.5% (by weight) deflocculant, which prevents the clay particles from adhering to one another. Sodium silicate is commonly used as a deflocculant. When 20% (by weight) water is added, the clay actually forms a liquid slurry (for formulas which involve other materials besides clay, these numbers may need to be adjusted), which is then stirred very thoroughly to eliminate dry pockets and voids. The slip is poured into a simple one piece or multi-piece plaster of paris mold with a cavity in the shape of the ceramic object desired. The plaster of Paris, because of its porous structure, dehydrates the slip, causing the parts of the slip touching the plaster of Paris to become solid again. After several minutes, the plaster mold is inverted, and while most of the slip pours and drips out, the slip adjacent to the plaster remains. After waiting approximately 20 minutes to allow the clay slip to dry out more, the plaster mold is then removed and the clay object dried further.
For an experimental study of refractory compositions see
section 13.2
8.1d Furnaces (Intro by VooDooMan)
Well then I see you have ventured into the realm of HIGH TEMPERATURES - EH! Yes it is definitely a great thing to learn about and perhaps even put to use some day! Never the less on we go onto our wonderful trip……………The reason I par took in this particular section is because I my self have extensive knowledge on this area. I have my own Forge / Foundry that I almost every day to smelt bronze, brass, aluminum, and other interesting metals that melt under the melting point of my refractory (approximately 1800C).
Well then, on we go, the basic idea of a forge/smelter/foundry and related, is to produce massive amounts of heat faster then it can dissipate to the surroundings to accomplish productive work. There are several types of furnaces, the first being (Which I believe is the one most used throughout the steel industry) the gas-fueled furnace. The other important type is the coiled electrical unit, more often then not, running on 220V for some serious power. Last but not least is the good old charcoal furnace, although outdated, it is the easiest furnace to get into the high temperature realm with.
When speaking strictly of the gas furnace, the way the flame from a gas burner is injected into the forge is of a critical interest to us. It is projected slightly higher then the bottom of the actual crucible and at an angle (not straight on but sideways so that the heat spirals up and around the crucible for uniform heating of items inside. The electrical unit does much the same thing but since it doesn’t spot heat, it is a better choice for pottery uses, the resistance elements are imbedded into the refractory / firebrick in a circular pattern all the way to the top of the forge.
Now then onto the actual guts of what makes a forge or foundry have a special zing to it. Any retard can heat a crucible to hot temperatures in a tin can and say look mommy I melted aluminum. Stop there, that is exactly the wrong idea. The whole idea of the forge is to keep hot temperatures in and only in with minimal heat escape when needed. That is why in most cases the refractory is several inches thick lining more then ¾ of a forge and only letting the crucible sit into it and a little room for air to be heated.
The composition of firebrick and refractory (pour able type of firebrick) are all-similar yet each has its own unique characteristic. They are more then often several types of sand mixed in with special customer wanted materials for special jobs. Also insulators like perlite or vermiculite are added.
There has been new talk of using recycled oils like from your car to heat the crucible of a gas forge, I am unable to comment on this part but I am sure with some good PSI being pumped into the oil and squeezing it out a large flare it is more then possible to create such a burner with very low cost!
Although most of this talk was from a metal casting point of view, there are several ways these processes can come into hand wile working with chemicals. For example, to create mangallium the metal that is used in go-getters or fountains or strobe pots and related. It is a mix of magnesium and aluminum melted together at high temperatures to essentially fuse together to form the material.
To sum it all up, of course the world is endless and there will be new advancements for our fuels and burner designs with new and improved refractory to keep an insane amount of temperatures inside. But for now the use of ordinary gasses I believe is our best bet. It is the easiest to setup and make and the fuels are extraordinarily cheap to buy.
There most simple and versatile
furnace design is a bucket lined with refractory, with a hole in the side near
the bottom for an air blast (tuyere) and a lid also lined with refractory, with
a hole in the center for exhaust gasses.
This can be used for metal casting, calcining of various materials, and
for conducting experiments in closed retorts, which can be hung through the
hole in the lid and piped off to the side. Other designs are better for other
things, which may be discussed later.
8.2 Fractional Distillation
|
Distilling hydrobromic acid (HBr) seemed to be simple enough so the amateur chemist thought that they would give it a shot. After mixing together the reagents in the prescribed manner the mix was put into a 1 L flat bottom flask connected to a still head, then to a lebig condenser and in turn to a vacuum adaptor and then a 500 ml round bottom receiving flask. A quick look in a book revealed that the Bp of the azeotrope would be 122.5 C. Heating was begun with magnetic stirring to keep the mix agitated. Some time later the mix began to boil. The first of the vapor to touch the thermometer bulb at the top of the still head only brought the temperature up in the mid 90's. The liquid condensed and dripped into the receiving flask and over the course of the next hour the temperature continued to climb, when it reached 118 C the chemist removed their current receiving flask and replaced it with a new once, they then set aside the forerun for future analysis and watched as the temperature continued to climb to 122 C where it held steady for over an hour, during this time over 100 ml of distillate came over. Shortly thereafter though the temperature began to drop as vapors no longer reached the bulb, signaling that the HBr azeotrope had finally finished distilling over and distillation could be discontinued. |
The purpose of a catalyst tube is simply to increase the rate at which a reaction happens. They are used widely in industry, most notably in the production of sulfuric acid using a vanadium pentoxide catalyst. But the different chemicals coated onto the catalyst themselves along with the sheer number of materials that can be coated onto are as limitless as the possibilities that using a catalyst can open. But there are always things to consider, contact time with the catalyst, approximate surface area of the catalyst, most effective temperature and how to keep it there, not to mention renewing the catalyst, keeping it clean, finding a tube to hold it all in, running the gasses or liquids through it at a certain flow, etc. As you can see there is quite a bit to this little aspect of chemistry, despite this, catalyst tubes are something that a chemist should familiarize themselves with regardless of if they intend to utilize the information or not.
There are some reactions out there where you just don't want the air coming into contact with your product or your reactants. The solution for this is the removal of the components you don't want mixing with your solution. That is where inert gasses come into play. By being inert that does not necessarily mean that the gas itself it inert under nearly all conditions. Just that it is not going to precipitate in the reaction going on. Two extreme examples of this would be argon, which is for all intents and purposes, totally inert, and propane, which is not considered inert to most due to its high flammability, however hydrocarbons are fairly inert, just not with respect to oxygen and an ignition source, propane therefore provides a cheap and readily available inert gas, however it does have its problems.
When working with an inert gas the standard procedure is to run it through a closed system for a length of time to flush out any previous gasses, then introduce your reagents quickly, preferably under the inert gas to prevent recontamination of the environment. Then sealing the system back off except for an exit and slowly letting the gas continue running though it. There is the concern of what to do with the exit gasses, which will depend on your reagents and your 'inert' gas but that is a specific problem. Although less useful inert gasses can also be used outside of a closed environment. All inert gases are by nature asphyxiants and therefore the gasses should not be vented into an enclosed area. They can aid evaporation if slowly run over a hot solution and they can also be used just being sprayed into a beaker to provide some protection, argon which is heavier then air is especially suited for this.
· Argon : Argon is a good blanketing gas approximately 38% heavier then air and will sink into the nooks and crannies of a distillation apparatus. It is not known to combine with anything at STP, although it does form HArF when irradiated with hydrogen fluoride at -255C but it decomposes about -245C so you shouldn't have to worry about extraneous reactions. Couple that with the fact that it is widely available for welding applications (although there is a bit of a startup fee including a cylinder, which you can rent, and a regulator) argon is well suited for most applications. As an exit gas you only have to worry about any contaminates in it, argon itself can be vented to the environment with no ill effects.
· Butane / Propane : Butane, commonly available as a refill gas for lighters, and propane, commonly available for just about everything are both gasses at STP, both are easily liquefied under pressure and vapors from either of these gasses are heavier then the surrounding air. As such they collect in low spots, unlike argon both of these gasses are highly flammable in the presence of oxygen, as such systems using them should be thoroughly flushed first and should not contain oxidizing agents or compounds that can yield free oxygen/halogens. In addition care must be taken with exit gasses containing these flammable products, they should be lead directly into a burner of some sort where they can be burned without hassle.
· Carbon Dioxide : Available in cylinders for the carbonation of beverages or as 'dry ice' relatively pure carbon dioxide has its sources outside of the lab setting. This gas is also denser then air, however it is more reactive then the others. It will ruin Grignard reactions, react with hydroxides and strong bases of all sorts and more, but it does have its uses, just be extra wary of reactivity. CO2, although not incredibly toxi,c can cause damage if inhaled in a concentrated form, but as long as it is used in vented conditions it is relatively safe.
· Freon : Freon is a tempting source for an inert atmosphere. First because it is widely available and second because the regulating equipment is sold right along side it. But that is where the benefits end, freon is flammable, and somewhat more reactive then these other inert gasses, it has oils in it and as for purity, well, it’s a grab bag. Use it at your own risk.
· Helium : Helium is the most widely available of the noble gasses and can be picked up from many places for the purpose of filing balloons, it even comes with its own cylinder. However the purity of such forms is questionable, unless it is in the large industrial containers it is usually mixed with a certain percentage of air. Beyond this helium is an extremely light gas that will not blanket a majority of your vessel, however extended flushing can help to overcome this, the price of commercial helium does not make it economically feasible in light of its light nature.
· Nitrogen : Has a limited availability as a welding gas. Also available in the liquid form, but be wary of frost bite. Nitrogen is the staple inert gas for the organic chemist, usually on tap in fume hoods. It is fairly non-reactive, cheap and easy to transport. Nitrogen is roughly equal to air in terms of density due to it making up about 80% of our atmosphere. There is no need to worry about venting nitrogen gas.
· Neon / Krypton / Xenon : Availability of these nobel gasses is considerably more limited. They posses properties nearly identical to argon for reference. The exception to this being Xenon, which is the most reactive of this group, it will react with fluorine and some other high oxidizing molecules, but not to any extent that the amateur chemist should have to worry about.
· Sulfur Hexafluoride : Fairly inert gas used in blanketing the setup used for the electrochemical production of magnesium metal. Not widely available, dense gas, not exceedingly toxic, TLV 1,000 PPM.
Taking care of exit gasses depends on what exactly is contaminating them. Disposing of radioactive chemicals by incineration of exit gasses is not advisable but the decomposition of organic material by leading exit gasses through a flame works in most cases. If there is a specific component in the gas that you expect to survive the flame then take the extra step to bubble the exit gasses through an appropriate solution to neutralize the offending contaminate. Occasionally a reaction will be called for to run under a specific gas that does not seem to be inert, it may well not be. If something is run under a chlorine atmosphere you can be that it is probably necessary for the reaction to commence.
When discontinuing use of the inert atmosphere the vessel must become slowly accustomed to regular atmosphere again, unless the apparatus is to be disassembled under an inert atmosphere in a fume hood and cleaned there. Unless the reaction products are explosive (boranes, phosphines, etc.), or exceedingly pyrophoric, simply removing the tube for the exit gas and turning off the flow of inert gas will suffice to bring the vessel back into atmospheric conditions as the gasses inside diffuse out and the gasses from the outside slowly work their way in. Explosive mixtures between the air and flammable gasses may form so it is necessary to allow the apparatus to cool to room temperature before hand.
8.5 Solvent/Solvent extraction systems
8.6 Vacuum Pumps and working under Vacuum
Vacuum
distillation is necessary when your compound decomposes when being boiled at
STP. The premise of boiling is that the vapor pressure of your substance
increases as it heats and when it gets to the boiling point, the vapor pressure
of your substance is equal to the atmospheric pressure, by reducing the
pressure you reduce the atmospheric pressure and therefore reduce the
temperature needed to boil the liquid.
It simply is distilling under reduced pressure and for the most part the
techniques mentioned earlier regarding distillation can be safely applied here
as well. There are however a few important observations. Boiling points of
different components don’t necessarily change in a linear way when the pressure
is altered. Simply said, it could mean that whilst the difference in vapor
pressure is 200mbar at STP, it could be 50mbar or 400mbar under reduced
pressure. Note that there are a number
of units with which pressure is measured:
|
|
mm Hg/Torr |
Atmospheres |
Pascal’s |
PSI |
in Hg/mbar |
|
Atmospheric Pressure |
760 torr |
1 atm |
101325 pa |
14.69 |
~1001 |
Usually
there is some indication, as to which pressure unit a book or text is using,
and conversion between pressure units is a simple task involving just a
constant, however these constants will not be listed here as they are many in
number, however finding them online is a simple matter.
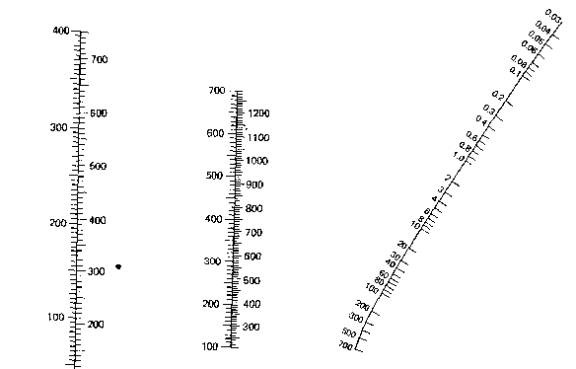
Using
the above table called a nomograph one can figure out around where a liquid
would boil. To use it you can copy it
to your favorite paint program and on the right hand side you find the pressure
at which you plan on distilling (in torr) and draw a line from that point
through the line in the middle at the point of your boiling point at standard
pressure and the intersection point on the left is in the region of your new
boiling point. Simple and easy and it
can give you an idea of how powerful your vacuum pump is.
The main
considerations when distilling under reduced pressure is the quality of your
glassware and pumps. Your lab glass needs to be borosilicate glass and it
should be in prime condition. Cracks or even scratches severely compromise the
strength of your glass under vacuum. Only round-bottomed flasks can be used
during vacuum distillation, no flat bottom flasks or Erlenmeyer’s! What could
possibly happen you think? Well, imagine a flask filled with boiling ethanol
imploding. It suddenly comes into contact with a surge of fresh air and
whooosh...flaming inferno all over and you being sprayed with glass pieces. That’s
why. Not to mention what would happen with acids, poisonous or otherwise
hazardous substances.
So your
glassware is in perfect shape. On to the other problems, boiling stones don’t
work under vacuum and boiling under vacuum can be very aggressive, so
aggressive that the bumping can crack your glass, after which it implodes.
Again, there are two solutions to this problem. A Claisen adapter (picture?)
with a capillary tube that is immersed in the liquid and then provides bubbles
is a way to go, or magnetic stirring, the authors personal preference.
|
Bumping Bumping is the ominous word used to describe a
sudden ‘bump’ in the distilling flask.
This can physically cause the flask to jump up and usually results in liquid
being projected from the liquid surface, occasionally all the way into the
still head and over into your receiving flask, ruining a distillation. Bumping is caused by a number of factors
in these situations but it comes down to a large bubble of gas forming and
violently making its way to the surface of your liquid. If bumping occurs (and it will
occasionally) the boiling flask should be removed from the heat for a few
moments until the bumping is passed and then placed back on the heat,
hopefully at a reduced level. If it
occurs again, repeat. There are a few
things that can be done to reduce/eliminate bumping:
|
It goes
without saying that your joints should be sealed well. This can be accomplished
by grease or commercially available teflon tape or specially designed teflon
joint fitters, which are expensive. Don’t neglect this aspect, because a joint
which fails after a while is another possible doom for you and your set up.
Special
care should also be taken in the way you fix your apparatus. You must avoid any
stress or strain caused by hanging flasks, flask that are being pushed up
because they float in the water bath, etc. Carefully balance your apparatus
before applying your vacuum.
Heating
is not an easy task when using vacuum. Flames or any other forms of localized
heating are a NO GO. A water or oil bath is preferable. You must also realize
that your set ups heat conductance is much lower because of the insulating
factor of the vacuum. That’s why the author also recommends magnetic stirring
of your bath, because this dramatically increases heat transfer. Otherwise you
risk a bath, which is at 90C while the inside of your flask is at 30C, which
causes a huge amount of stress and is generally energy consuming.
Finally,
wrapping your glass with a wire mesh or laminating it with heat resistant
plastic protects you from flying glass should something go wrong.
When first starting a procedure involving distillation using vacuum there is a sequence of events that one should follow:
Applying vacuum should be done
FIRST, before heating starts. If you start heating first and then apply vacuum,
there is a severe hazard that your liquid will flash boil when the pressure
drops. Flash boiling usually comes with a pressure spike, insane bumping and a
lot of frothing. Short & sweet, it means death to your setup and possibly
to you. You also should start up your stirring or bubbling at the same time
your heating starts, because if you do it too late, there is again a risk of
flash boiling.
When you're done distilling,
allow the apparatus to cool down first, then allow air to enter. If done otherwise, hot solvent vapor can
come into contact with fresh air and reach the explosive range...which again
means flaming inferno all over and flying glass.
Vacuum is being applied to this flask to remove ammonia as it is formed to drive the reaction foreword, the product remains in the flask.